
この記事は公開されてから1年以上経過しています。情報が古い可能性がありますので十分ご注意ください。
皆様こんにちは。
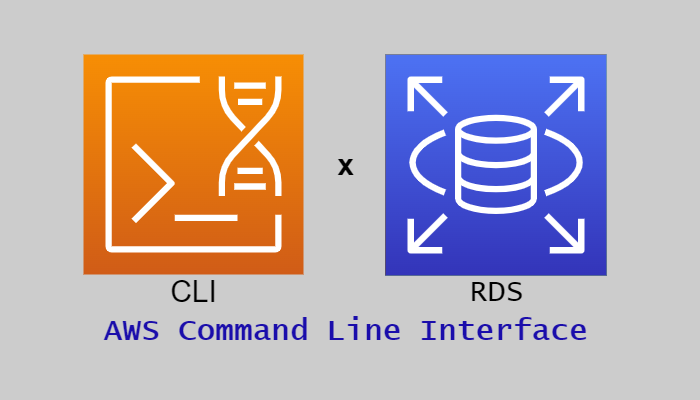
今回はCLIを利用して高可用性アーキテクトの構築をしていきます。
この記事ではCLIよりRDSの作成を行います。
このブログはCLIによるRDSの作成をする上での知識を記事としてまとめ再確認し、皆様と共有するため作成します。
1.高可用性アーキテクト構築目次
2.RDSとは
Amazon Relational Database Service (Amazon RDS) は、AWS クラウド でリレーショナルデータベースを簡単にセットアップし、運用し、スケーリングすることのできるウェブサービスです。業界スタンダードのリレーショナルデータベース向けに、費用対効果に優れたエクステンションを備え、一般的なデータベース管理タスクを管理します。
引用:Amazon Relational Database Service (Amazon RDS) とは
今回は高可用性アーキテクトを構築していくうえで必要なデータベースとしてRDSをマルチAZ配置で利用します。
類似サービスとして「Amazon DynamoDB」、「Amazon Redshift」などがあげられます。
3.フロー図
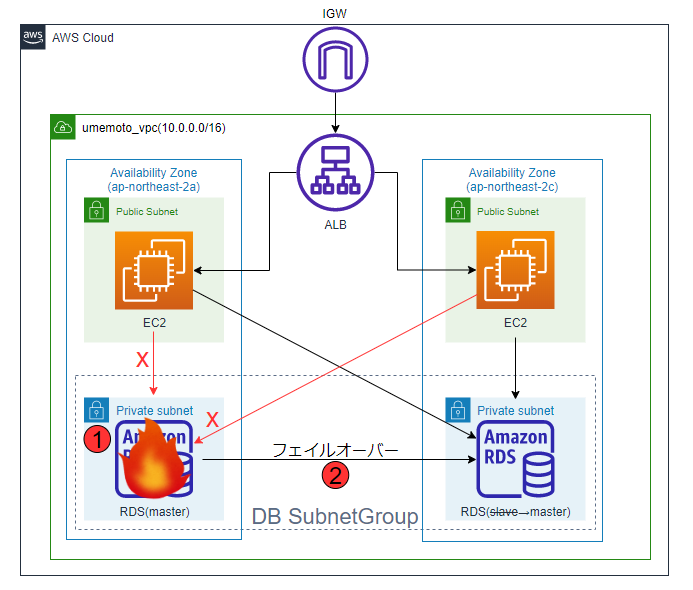
マルチAZ配置で冗長化し、以下のフローで可用性を高めます。
- 障害が発生し、マスターのRDSが利用不可になります。
- フェイルオーバー(スレーブのRDSをマスターに昇格)し、処理をもう一台のRDSで引き継ぎます。
4.RDS構築
ではこれからRDSを構築していきましょう。
4-1.サブネットグループ
RDSを作成する前にRDSで使用するサブネットグループを作成します。
4-2-1.サブネットグループとは
DB サブネットグループは VPC に作成するサブネット (通常はプライベート) のコレクションで、DB インスタンス用に指定します。DB サブネットグループを使用することにより、CLI または API を使用して DB インスタンスを作成するときに、特定の VPC を指定することができます。コンソールを使用する場合は、使用する VPC とサブネットを選択できます。
各 DB サブネットグループには、特定の AWS リージョン 内の少なくとも 2 つのアベイラビリティーゾーンにサブネットが必要です。
引用:DBサブネットグループの使用
4-2-2.サブネットグループ作成
サブネットグループには二つのプライベートサブネットを指定します。
作成には、[aws rds create-db-subnet-group]コマンドを使用します。
| 使用するオプション | 設定値 | 説明 |
|---|---|---|
| --db-subnet-group-name | umemoto_dbsubnet | 設定したいサブネットグループの名前を入力 |
| --db-subnet-group-description | "dedicated to umemoto-rds" | サブネットグループの説明を入力 |
| --subnet-ids | subnet-xxxxx, subnet-xxxxx | 前回作成した二つのプライベートサブネットのIDを入力 |
| --tags | Key=Name,Value=umemoto_dbsubnet | 設定したいタグを入力 |
入力
aws rds create-db-subnet-group `
    --db-subnet-group-name umemoto_dbsubnet `
    --db-subnet-group-description "dedicated to umemoto-rds" `
    --subnet-ids subnet-xxxxx subnet-xxxxx `
    --tags Key=Name,Value=umemoto_dbsubnet
出力
{
    "DBSubnetGroup": {
        "DBSubnetGroupName": "umemoto_dbsubnet",
        "DBSubnetGroupDescription": "dedicated to umemoto-rds",
        "VpcId": "vpc-xxxxx",
        "SubnetGroupStatus": "Complete",
        "Subnets": [
            {
                "SubnetIdentifier": "subnet-xxxxx",
                "SubnetAvailabilityZone": {
                    "Name": "ap-northeast-2c"
                },
                "SubnetOutpost": {},
                "SubnetStatus": "Active"
            },
            {
                "SubnetIdentifier": "subnet-xxxxx",
                "SubnetAvailabilityZone": {
                    "Name": "ap-northeast-2a"
                },
                "SubnetOutpost": {},
                "SubnetStatus": "Active"
            }
        ],
        "DBSubnetGroupArn": "arn:aws:rds:ap-northeast-2:xxxxx:subgrp:umemoto_dbsubnet"
    }
}
これでサブネットグループの作成を完了しました。
4-2.RDS作成
次はRDSを作成していきましょう。 RDS作成には、[aws rds create-db-instance]コマンドを使用します。
| 使用するオプション | 設定値 | 説明 |
|---|---|---|
| --db-instance-identifier | umemoto-rds | 設定したいDBインスタンス識別子を入力 |
| --db-instance-class | db.t3.micro | DBインスタンスタイプを入力 |
| --engine | mysql | 使用したいDBエンジンを入力 |
| --engine-version | 8.0.20 | 設定したいエンジンのversionを入力 |
| --db-name | umemotords | 設定したいデータベース名を入力 |
| --master-username | admin | 設定したいマスターユーザー名を入力 |
| --master-user-password | xxxxx | 設定したいDBパスワードを入力 |
| --allocated-storage | 20 | コストを考慮して最小値を入力 |
| --multi-az | オプションの入力で有効化されます | 高可用性のためマルチAZを有効化 |
| --storage-encrypted | オプションの入力で有効化されます | 暗号化を有効に |
| --kms-key-id | xxxxx-xxxx-xxxx-xxxx-xxxxx | 作成した暗号化鍵のIDを入力 |
| --no-publicly-accessible | オプションの入力で無効化されます | パブリックアクセスを無効化 |
| --vpc-security-group-ids | sg-xxxxx | 前回作成したRDSのSGのIDを入力 |
| --db-subnet-group-name | umemoto_dbsubnet | 先ほど作成したサブネットグループのIDを入力 |
| --no-copy-tags-to-snapshot | オプションの入力で無効化されます | 今回はスナップショットを作成しないので無効化 |
| --backup-retention-period | 0 | 今回は自動バックアップを利用しないので無効化 |
| --tags | Key=Name,Value=umemoto-rds | 設定したいタグを入力 |
入力
aws rds create-db-instance `
    --db-instance-identifier umemoto-rds `
    --db-instance-class db.t3.micro `
    --engine mysql --engine-version 8.0.20 `
    --db-name umemotords `
    --master-username admin `
    --master-user-password xxxxx `
    --allocated-storage 20 `
    --multi-az --storage-encrypted `
    --kms-key-id xxxxx-xxxx-xxxx-xxxx-xxxxx `
    --no-publicly-accessible `
    --vpc-security-group-ids sg-xxxxx `
    --db-subnet-group-name umemoto_dbsubnet `
    --no-copy-tags-to-snapshot `
    --backup-retention-period 0 `
    --tags Key=Name,Value=umemoto-rds
出力
{
    "DBInstance": {
        "DBInstanceIdentifier": "umemoto-rds",
        "DBInstanceClass": "db.t3.micro",
        "Engine": "mysql",
        "DBInstanceStatus": "creating",
        "MasterUsername": "admin",
        "DBName": "umemotords",
        "AllocatedStorage": 20,
        "PreferredBackupWindow": "15:29-15:59",
        "BackupRetentionPeriod": 0,
        "DBSecurityGroups": [],
        "VpcSecurityGroups": [
            {
                "VpcSecurityGroupId": "sg-xxxxx",
                "Status": "active"
            }
        ],
        "DBParameterGroups": [
            {
                "DBParameterGroupName": "default.mysql8.0",
                "ParameterApplyStatus": "in-sync"
            }
        ],
        "DBSubnetGroup": {
            "DBSubnetGroupName": "umemoto_dbsubnet",
            "DBSubnetGroupDescription": "dedicated toumemoto-rds",
            "VpcId": "vpc-xxxxx",
            "SubnetGroupStatus": "Complete",
            "Subnets": [
                {
                    "SubnetIdentifier": "subnet-xxxxx",
                    "SubnetAvailabilityZone": {
                        "Name": "ap-northeast-2c"
                    },
                    "SubnetOutpost": {},
                    "SubnetStatus": "Active"
                },
                {
                    "SubnetIdentifier": "subnet-xxxxx",
                    "SubnetAvailabilityZone": {
                        "Name": "ap-northeast-2a"
                    },
                    "SubnetOutpost": {},
                    "SubnetStatus": "Active"
                }
            ]
        },
        "PreferredMaintenanceWindow": "sun:17:11-sun:17:41",
        "PendingModifiedValues": {
            "MasterUserPassword": "****"
        },
        "MultiAZ": true,
        "EngineVersion": "8.0.20",
        "AutoMinorVersionUpgrade": true,
        "ReadReplicaDBInstanceIdentifiers": [],
        "LicenseModel": "general-public-license",
        "OptionGroupMemberships": [
            {
                "OptionGroupName": "default:mysql-8-0",
                "Status": "in-sync"
            }
        ],
        "PubliclyAccessible": false,
        "StorageType": "gp2",
        "DbInstancePort": 0,
        "StorageEncrypted": true,
        "KmsKeyId": "arn:aws:kms:ap-northeast-2:xxxxx:key/xxxxx-xxxx-xxxx-xxxx-xxxxx",
        "DbiResourceId": "db-xxxxx",
        "CACertificateIdentifier": "rds-ca-2019",
        "DomainMemberships": [],
        "CopyTagsToSnapshot": false,
        "MonitoringInterval": 0,
        "DBInstanceArn": "arn:aws:rds:ap-northeast-2:xxxxx:db:umemoto-rds",
        "IAMDatabaseAuthenticationEnabled": false,
        "PerformanceInsightsEnabled": false,
        "DeletionProtection": true,
        "AssociatedRoles": [],
        "TagList": [
            {
                "Key": "Name",
                "Value": "umemoto-rds"
            }
        ],
        "CustomerOwnedIpEnabled": false,
        "BackupTarget": "region"
    }
}
これでRDSを作成できました。
5.RDS検証
作成したRDSがEC2から接続できるかのテストをしましょう。
※こちらの検証はEC2構築後に検証しています
①SSHでEC2に接続したら以下のコマンドでRDSに接続します。
mysql -h エンドポイント -P 3306 -u ユーザー名 -p データベース名出力
Enter password:
Reading table information for completion of table and column names
You can turn off this feature to get a quicker startup with -A

Welcome to the MariaDB monitor.  Commands end with ; or \g.
Your MySQL connection id is 30
Server version: 8.0.20 Source distribution

Copyright (c) 2000, 2018, Oracle, MariaDB Corporation Ab and others.

Type 'help;' or '\h' for help. Type '\c' to clear the current input statement.

MySQL [umemotords]>
これでRDSに接続できました。
6.感想
RDS作成はオプションコマンドも多く作成が大変でしたがエラーなどは発生しないで作成完了することができてよかったです。
7.参照
AWS CLI Command Reference – rds
https://awscli.amazonaws.com/v2/documentation/api/latest/reference/rds/index.html