この記事は公開されてから1年以上経過しています。情報が古い可能性がありますので十分ご注意ください。
はじめに
来年のプロジェクトに向け AWS Database Migration Serviceについて調査する機会があったため構築手順をブログにします。
スコープとなっているデータベースはMySQLどうしのため同種データ移行でのプロセスを記載する。
AWS Database Migration Service とは?
AWS Database Migration Service (AWS DMS) は、リレーショナルデータベース、データウェアハウス、NoSQL データベースなどをAWSクラウドへ移行するためのサービスです。このサービスを利用することで、以下の三つの主要機能を実行できます。
①ソースデータの検出:「DMS Fleet Advisor」を使用してオンプレミスのインフラストラクチャを分析し、クラウド移行のための準備を整えます。
②スキーマ変換:「AWS Schema Conversion Tool (AWS SCT)」を使用して、異なるデータベースエンジン間でのスキーマ変換をサポートし、移行プロセスを容易にします。
③データ移行:AWS DMSは、単発のデータ移行や、ソースとターゲット間の継続的なデータ同期を可能にする主要な機能です。
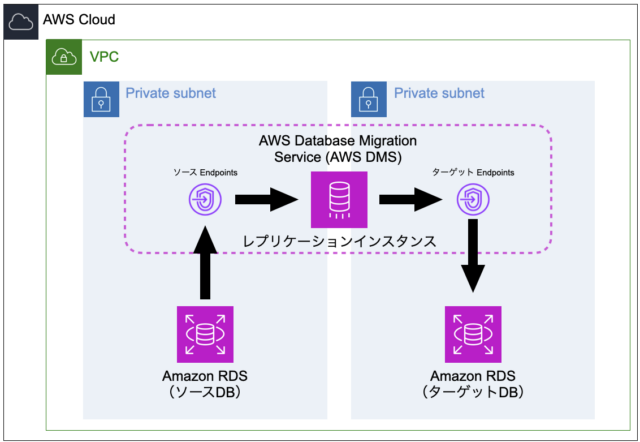
構成
構成図

参考リンク
AWSドキュメント系
AWS Database Migration Service とは?
テックブログ系
AWS Database Migration Service(AWS DMS)を使ったデータ移行(前編)
AWS Database Migration Service(AWS DMS)を使ったデータ移行(後編)
構築
前提条件
・GUI操作を極力減らすため、CloudShellより構築を実施する
・リージョン:ap-northeast-1(東京)で構築
・VPC,プライベートサブネット:既にVPCとプライベートサブネットの構築が完了しているとする
・SourceDBの設定:テスト目的のため、ほぼデフォルト設定
| エンジン | エンジンバージョン | サイズ | AZ |
|---|---|---|---|
| MySQL | 8.0.33 | db.t3.micro | シングルAZ |
・TargetDBの設定:テスト目的のため、ほぼデフォルト設定
| エンジン | エンジンバージョン | サイズ | AZ |
|---|---|---|---|
| MySQL | 8.0.33 | db.t3.micro | シングルAZ |
参考:AWS Database Migration Service の前提条件
1.DMSレプリケーションインスタンス用セキュリティグループ作成
下記コマンドをcloudshellで実施し、DMSレプリケーションインスタンスのSGを作成する。
RDSへののアウトバウンド通信を許可する。
※VPC_NAME, SG_NAMEについては利用者で任意の名前を入力する
VPC_NAME="SGを作成したいVPC名"
SG_NAME="レプリケーションインスタンスにアタッチするSG名"
VPC_ID=$(aws ec2 describe-vpcs --filters "Name=tag:Name,Values=$VPC_NAME" --query "Vpcs[0].VpcId" --output text)
echo $VPC_ID
SG_ID_JSON=$(aws ec2 create-security-group --group-name $SG_NAME --description "Security group for DMS replication instance" --vpc-id $VPC_ID)
SG_ID=$(echo $SG_ID_JSON | jq -r '.GroupId')
echo $SG_ID
aws ec2 authorize-security-group-egress \
    --group-id $SG_ID \
    --protocol tcp \
    --port 3306 \
    --cidr 0.0.0.0/0
2.DMSレプリケーションインスタンス作成
2.1.サブネットグループの作成
下記コマンドをcloudshellで実施し、DMSレプリケーションインスタンスのサブネットグループを作成する。
※SUBNET_1, SUBNET_2については利用者で任意の名前を入力する
SUBNET_1="DMSレプリケーションサーバを作成するサブネット名_1"
SUBNET_2="DMSレプリケーションサーバを作成するサブネット名_2"
SUBNET_ID_1=$(aws ec2 describe-subnets --filters "Name=tag:Name,Values=$SUBNET_1" --query "Subnets[*].SubnetId" --output text)
SUBNET_ID_2=$(aws ec2 describe-subnets --filters "Name=tag:Name,Values=$SUBNET_2" --query "Subnets[*].SubnetId" --output text)
echo $SUBNET_ID_1
echo $SUBNET_ID_2
SUBNET_GROUP_JSON=$(aws dms create-replication-subnet-group \
    --replication-subnet-group-identifier dms-subnet-group \
    --replication-subnet-group-description "Subnet group for DMS replication instance" \
    --subnet-ids $SUBNET_ID_1 $SUBNET_ID_2)
SUBNET_GROUP=$(echo $SUBNET_GROUP_JSON | jq -r '.ReplicationSubnetGroup.ReplicationSubnetGroupIdentifier')
2.2.DMSレプリケーションインスタンス作成
下記コマンドをcloudshellで実施し、DMSレプリケーションインスタンスを作成する
| インスタンスクラス | SG | サブネットグループ | AZ | ストレージ(Gib) | パブリックアクセス |
|---|---|---|---|---|---|
| dms.t2.micro | 手順1で構築SG | 手順2で構築グループ | シングルAZ | 5 | 不可 |
REPLICATION_INSTANCE_NAME_JSON=$(aws dms create-replication-instance \
    --replication-instance-identifier dms-replication-instance \
    --replication-instance-class dms.t2.micro \
    --vpc-security-group-ids $SG_ID \
    --replication-subnet-group-identifier $SUBNET_GROUP \
    --no-multi-az \
    --allocated-storage 5 \
    --no-publicly-accessible)
上記、DMSレプリケーションインスタンス構築後に下記コマンドを実施
REPLICATION_INSTANCE_NAME=$(echo $REPLICATION_INSTANCE_NAME_JSON | jq -r '.ReplicationInstance.ReplicationInstanceIdentifier')
echo $REPLICATION_INSTANCE_NAME

VpcSecurityGroupId": "sg-05f4ca024313ba6ed"
3.DMSエンドポイント作成
3.1.ソースエンドポイント作成
下記コマンドをcloudshellで実施し、ソースエンドポイントを作成する
SOURCE_DB_USERNAME="ソースDBのユーザ名"
SOURCE_DB_PASSWORD="ソースDBのパスワード"
SOURCE_DB_ENDPOINT="ソースDBのエンドポイント"

SOURCE_ENDPOINT_JSON=$(aws dms create-endpoint \
    --endpoint-type source \
    --endpoint-identifier "source-endpoint" \
    --engine-name "mysql" \
    --username $SOURCE_DB_USERNAME \
    --password $SOURCE_DB_PASSWORD \
    --server-name $SOURCE_DB_ENDPOINT \
    --port 3306 \
    --ssl-mode "none")
3.2.ターゲットエンドポイント作成
下記コマンドをcloudshellで実施し、ターゲットエンドポイントを作成する
TARGET_DB_USERNAME="ターゲットDBのユーザ名"
TARGET_DB_PASSWORD="ターゲットDBのパスワード"
TARGET_DB_ENDPOINT="ターゲットDBのエンドポイント"

TARGET_ENDPOINT_JSON=$(aws dms create-endpoint \
    --endpoint-type target \
    --endpoint-identifier "target-endpoint" \
    --engine-name "mysql" \
    --username $TARGET_DB_USERNAME \
    --password $TARGET_DB_PASSWORD \
    --server-name $TARGET_DB_ENDPOINT \
    --port 3306 \
    --ssl-mode "none")
3.3.RDSのSGに穴あけ
下記コマンドをcloudshellで実施し、RDSのSG(ソース/ターゲット両方)にレプリケーションインスタンスから TCP/3306 の通信を許可する
SOURCE_DB_NAME="ソースDB名"
TARGET_DB_NAME="ターゲットDB名"

REPLICATION_INSTANCE_SG=$(echo $REPLICATION_INSTANCE_NAME_JSON | jq -r '.ReplicationInstance.VpcSecurityGroups[].VpcSecurityGroupId')

SOURCE_DB_SG_ID=$(aws rds describe-db-instances --db-instance-identifier $SOURCE_DB_NAME | jq -r '.DBInstances[0].VpcSecurityGroups[].VpcSecurityGroupId')

TARGET_DB_SG_ID=$(aws rds describe-db-instances --db-instance-identifier $TARGET_DB_NAME | jq -r '.DBInstances[0].VpcSecurityGroups[].VpcSecurityGroupId')

aws ec2 authorize-security-group-ingress \
    --group-id $SourceDB_SG_ID \
    --protocol tcp \
    --port 3306 \
    --source-group $REPLICATION_INSTANCE_SG

aws ec2 authorize-security-group-ingress \
    --group-id $TargetDB_SG_ID \
    --protocol tcp \
    --port 3306 \
    --source-group $REPLICATION_INSTANCE_SG
4.DMSデータベース移行タスク作成
4.1.移行タスク作成
下記コマンドをcloudshellで実施し、移行タスクを作成する
※今回 SourceDB側には
SOURCE_ENDPOINT_ARN=$(echo $SOURCE_ENDPOINT_JSON | jq -r '.Endpoint.EndpointArn')
TARGET_ENDPOINT_ARN=$(echo $TARGET_ENDPOINT_JSON | jq -r '.Endpoint.EndpointArn')
REPLICATION_INSTANCE_ARN=$(echo $REPLICATION_INSTANCE_NAME_JSON | jq -r '.ReplicationInstance.ReplicationInstanceArn')

echo '{
    "rules": [
        {
            "rule-type": "selection",
            "rule-id": "1",
            "rule-name": "1",
            "object-locator": {
                "schema-name": "dms_db",
                "table-name": "%"
            },
            "rule-action": "include"
        }
    ]
}' > /home/cloudshell-user/table-mapping.json

aws dms create-replication-task \
    --replication-task-identifier "dms-replication-task" \
    --source-endpoint-arn $SOURCE_ENDPOINT_ARN \
    --target-endpoint-arn $TARGET_ENDPOINT_ARN \
    --replication-instance-arn $REPLICATION_INSTANCE_ARN \
    --migration-type "full-load" \
    --debug \
    --table-mappings file:///home/cloudshell-user/table-mapping.json
4.2.移行タスク実行
①AWSマネジメントコンソールのDMS「データベース移行タスク」より構築したタスクを選択し、「再起動/再開」を押下

②ステータスが「ロード完了」になるまで待機

挙動の確認
1.TargetDBにデータベース・テーブルが移行されている
データ移行前
mysql> SHOW DATABASES;
+--------------------+
| Database           |
+--------------------+
| information_schema |
| mysql              |
| performance_schema |
| sys                |
+--------------------+
4 rows in set (0.00 sec)
データ移行後
「dsm_db」がソースDBより移行されている
mysql> SHOW DATABASES;
+--------------------+
| Database           |
+--------------------+
| dms_db             |
| information_schema |
| mysql              |
| performance_schema |
| sys                |
+--------------------+
5 rows in set (0.00 sec)

mysql> USE dms_db
Database changed
mysql> SELECT * FROM products;
+------------+--------+-------+-----------+
| product_no | name   | price | category  |
+------------+--------+-------+-----------+
|          1 | carrot |    60 | vegetable |
|          2 | apple  |   200 | fruit     |
|          3 | milk   |   150 | drink     |
+------------+--------+-------+-----------+
3 rows in set (0.00 sec)
さいごに
次回は継続的レプリケーションの設定でDMSの実施をしてみたいと思います。
そして裏テーマとしてGUI操作でのオペミスを減らそうと思い、生成系AIの力も借りて出来る限りCLI操作で手順書もつくれたのは個人的には満足です。
次回からもCLIを利用しながらの、ブログを書いていきたい所存でございます。


