


この記事は公開されてから1年以上経過しています。情報が古い可能性がありますので十分ご注意ください。
皆様こんにちは。
今回はCLIを利用して高可用性アーキテクトの構築をしていきます。
この記事ではCLIよりロードバランサーの一種であるALBの作成を行います。
このブログはCLIによるALBの作成をする上での知識を記事としてまとめ再確認し、皆様と共有するため作成します。
1.高可用性アーキテクト構築目次
2.ロードバランサーとは
ELB (Elastic Load Balancing) は、アプリケーションへのトラフィックを、1 つまたは複数のアベイラビリティーゾーン (AZ) 内の複数のターゲットおよび仮想アプライアンスに自動的に分散します。
引用:Amazon Elastic Load Balancing
Application Load Balancer(ALB)
ALBはアプリケーションレイヤーで機能し、HTTPトラフィックおよびHTTPSトラフィックの負荷分散をします。
Network Load Balancer(NLB)
NLBはトランスポートレイヤーで機能し、TCP,UDP,TLSにおけるトラフィックの負荷分散します。
Gateway Load Balancer(GWLB)
GWLBはネットワークレイヤーで機能します。
GENEVE をサポートするサードパーティーの仮想アプライアンスのフリートをデプロイおよび管理する必要がある場合は、GWLBを利用します。
Classic Load Balancer(CLB)
CLBは、アプリケーションレイヤーとトランスポートレイヤー両方で機能します。
EC2-Classic ネットワークで既存のアプリケーションを実行している場合は、CLBを利用します。
今回はアプリケーションレイヤーでトラフィックを振り分け負荷分散したいので、ALBを利用します。
類似サービスとしては負荷に応じてリソース数をスケーリングする「AWS Auto Scaling」があげられます。
3フロー図
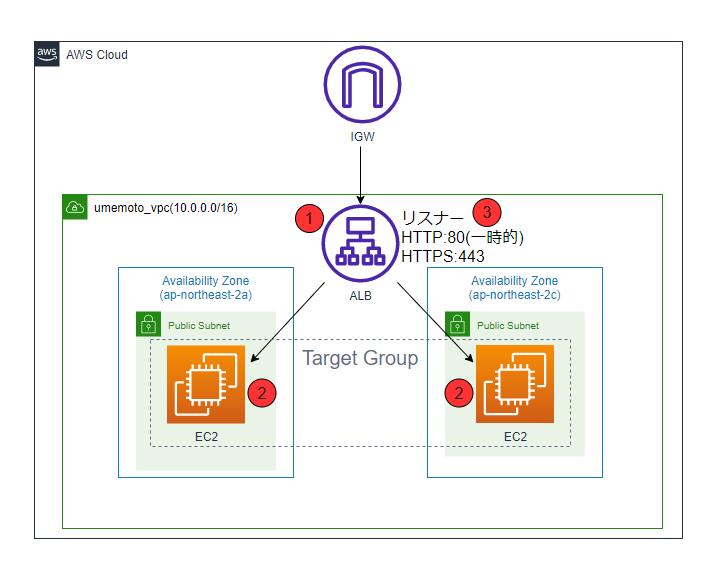
今回のALB構築のフローは以下になります。
- ALB本体の作成をします。
- ターゲットグループを作成して、ターゲットに前回作成した二つのEC2インスタンスを指定します。
- リスナーの追加をします。(Wordpress上でhttps設定を完了するまではHTTPリスナーも追加します)
4.ALB構築
ではこれからALBの構築をしていきます。
4-1.ALB作成
まずALB本体を作成します。
作成のために、[aws elbv2 create-load-balancer]コマンドを使用します。
| 使用するオプション | 設定値 | 説明 |
|---|---|---|
| --type | application | ロードバランサの種類はALBを指定 |
| --scheme | internet-facing | 外部に公開するため |
| --ip-address-type | ipv4 | ipv6を使用しないためipv4のみ指定 |
| --name | umemoto-ALB | ALBの名前を入力 |
| --subnets | subnet-xxxxx subnet-xxxxx | 二つのパブリックサブネットを指定 |
| --security-groups | sg-xxxxx | 前回作成したALB用のSGのIDを入力 |
| --tags | Key=Name,Value=umemoto-ALB | タグを入力 |
入力
aws elbv2 create-load-balancer `
    --type application `
    --scheme internet-facing `
    --ip-address-type ipv4 `
    --name umemoto-ALB `
    --subnets subnet-xxxxx subnet-xxxxx `
    --security-groups sg-xxxxx `
    --tags Key=Name,Value=umemoto-ALB
出力
{
    "LoadBalancers": [
        {
            "LoadBalancerArn": "arn:aws:elasticloadbalancing:ap-northeast-2:xxxxx:loadbalancer/app/umemoto-ALB/xxxxx",
            "DNSName": "umemoto-ALB-xxxxx.ap-northeast-2.elb.amazonaws.com",
            "CanonicalHostedZoneId": "xxxxx",
            "CreatedTime": "2022-05-11T04:13:39.560000+00:00",
            "LoadBalancerName": "umemoto-ALB",
            "Scheme": "internet-facing",
            "VpcId": "vpc-xxxxx",
            "State": {
                "Code": "provisioning"
            },
            "Type": "application",
            "AvailabilityZones": [
                {
                    "ZoneName": "ap-northeast-2c",
                    "SubnetId": "subnet-xxxxx",
                    "LoadBalancerAddresses": []
                },
                {
                    "ZoneName": "ap-northeast-2a",
                    "SubnetId": "subnet-xxxxx",
                    "LoadBalancerAddresses": []
                }
            ],
            "SecurityGroups": [
                "sg-xxxxx5"
            ],
            "IpAddressType": "ipv4"
        }
    ]
}
これでALB本体の作成ができました。
4-2.ターゲットグループ
次にターゲットグループ(以下TGN)の作成をします。
ターゲットグループには前回作成した二つのEC2を指定し、負荷分散の対象にします。
4-2-1.ターゲットグループとは
各ターゲットグループは、1 つ以上の登録されているターゲットにリクエストをルーティングするために使用されます。各リスナーのルールを作成するときに、ターゲットグループと条件を指定します。ルールの条件が満たされると、トラフィックが該当するターゲットグループに転送されます。さまざまなタイプのリクエストに応じて別のターゲットグループを作成できます。
引用:Application Load Balancer のターゲットグループ
4-2-2.ターゲットグループ作成
作成のため、[aws elbv2 create-target-group]コマンドを使用します。
| 使用するオプション | 設定値 | 説明 |
|---|---|---|
| --name | umemoto-TGN | TGNのネームを設定 |
| --target-type | instance | 先ほど作成したEC2にALBを設定したいため、instanceを設定 |
| --protocol-version | HTTP1 | プロトコルのversionを指定 |
| --health-check-enabled | オプションの入力で有効化されます | ヘルスチェックを有効化します |
| --matcher | HttpCode=200\,301 | 成功コードを指定 |
| --protocol | HTTP | プロトコルを指定 |
| --port | 80 | ポート番号を入力 |
| --vpc-id | vpc-xxxxx | vpcのIDを入力 |
| --ip-address-type | ipv4 | 今回はipv6を使用しないため、ipv4のみ指定 |
| --tags | Key=Name,Value=umemoto-TGN | タグを設定 |
入力
aws elbv2 create-target-group `
    --name umemoto-TGN `
    --target-type instance `
    --protocol-version HTTP1 `
    --health-check-enabled `
    --matcher HttpCode=200\,301 `
    --protocol HTTP `
    --port 80 `
    --vpc-id vpc-xxxxx `
    --ip-address-type ipv4 `
    --tags Key=Name,Value=umemoto-TGN
出力
{
    "TargetGroups": [
        {
            "TargetGroupArn": "arn:aws:elasticloadbalancing:ap-northeast-2:xxxxx:targetgroup/umemoto-TGN/xxxxx",
            "TargetGroupName": "umemoto-TGN",
            "Protocol": "HTTP",
            "Port": 80,
            "VpcId": "vpc-xxxxx",
            "HealthCheckProtocol": "HTTP",
            "HealthCheckPort": "traffic-port",
            "HealthCheckEnabled": true,
            "HealthCheckIntervalSeconds": 30,
            "HealthCheckTimeoutSeconds": 5,
            "HealthyThresholdCount": 5,
            "UnhealthyThresholdCount": 2,
            "HealthCheckPath": "/",
            "Matcher": {
                "HttpCode": "200,301"
            },
            "TargetType": "instance",
            "ProtocolVersion": "HTTP1",
            "IpAddressType": "ipv4"
        }
    ]
}
これでTGNの作成ができました。
次にTGNにターゲットの登録をします。
登録のために、[aws elbv2 register-targets]コマンドを使用します。
| 使用するオプション | 設定値 | 説明 |
|---|---|---|
| --target-group-arn | arn:aws:elasticloadbalancing:ap-northeast-2:xxxxx:targetgroup/umemoto-TGN/xxxxx | TGNのARNの入力 |
| --targets | Id=i-xxxxx Id=i-xxxxx | 先ほど作成した二つのEC2のIDを入力 |
入力
aws elbv2 register-targets `
    --target-group-arn arn:aws:elasticloadbalancing:ap-northeast-2:xxxxx:targetgroup/umemoto-TGN/xxxxx  `
    --targets Id=i-xxxxx Id=i-xxxxx
出力なし
ターゲットが登録できたかの確認のため、[aws elbv2 describe-target-health]コマンドを使用します。
| 使用するオプション | 設定値 | 説明 |
|---|---|---|
| --target-group-arn | arn:aws:elasticloadbalancing:ap-northeast-2:xxxxx:targetgroup/umemoto-TGN/xxxxx | TGNのARNの入力 |
入力
aws elbv2 describe-target-health `
    --target-group-arn arn:aws:elasticloadbalancing:ap-northeast-2:xxxxx:targetgroup/umemoto-TGN/xxxxx
出力
{
    "TargetHealthDescriptions": [
        {
            "Target": {
                "Id": "i-xxxxx",
                "Port": 80
            },
            "HealthCheckPort": "80",
            "TargetHealth": {
                "State": "unused",
                "Reason": "Target.NotInUse",
                "Description": "Target group is not configured to receive traffic from the load balancer"
            }
        },
        {
            "Target": {
                "Id": "i-xxxxx",
                "Port": 80
            },
            "HealthCheckPort": "80",
            "TargetHealth": {
                "State": "unused",
                "Reason": "Target.NotInUse",
                "Description": "Target group is not configured to receive traffic from the load balancer"
            }
        }
    ]
}
ターゲットの登録を確認できました。(ALB本体の作成と紐付けを行っていないため状態はunusedです)
4-3.リスナー設定
最後にリスナーの設定をします。
WordPress上でhttps設定をするまでは一時的にhttpを使用するのでリスナーに追加します。
4-3-1.リスナーとは
Application Load Balancer の使用を開始する前に、1 つまたは複数のリスナーを追加する必要があります。リスナーとは、設定したプロトコルとポートを使用して接続リクエストをチェックするプロセスです。リスナーに対して定義したルールにより、ロードバランサーが登録済みターゲットにリクエストをルーティングする方法が決まります。
引用:Application Load Balancer のリスナー
4-3-2.リスナー作成
設定のために、[aws elbv2 create-listener]コマンドを使用します。
| 使用するオプション | 設定値 | 説明 |
|---|---|---|
| --load-balancer-arn | arn:aws:elasticloadbalancing:ap-northeast-2:xxxxx:loadbalancer/app/umemoto-ALB/xxxxx | ALBのARNを指定 |
| --protocol | HTTP | プロトコルを指定 |
| --port | 80 | ポート番号を入力 |
| --default-actions | Type=forward,TargetGroupArn= arn:aws:elasticloadbalancing:ap-northeast-2:xxxxx:targetgroup/umemoto-TGN/xxxxx |
TGNのARNを指定 |
入力
aws elbv2 create-listener `
    --load-balancer-arn arn:aws:elasticloadbalancing:ap-northeast-2:xxxxx:loadbalancer/app/umemoto-ALB/xxxxx `
    --protocol HTTP `
    --port 80 `
    --default-actions Type=forward,TargetGroupArn=arn:aws:elasticloadbalancing:ap-northeast-2:xxxxx:targetgroup/umemoto-TGN/xxxxx
出力
{
    "Listeners": [
        {
            "ListenerArn": "arn:aws:elasticloadbalancing:ap-northeast-2:xxxxx:listener/app/umemoto-ALB/xxxxx/xxxxx",
            "LoadBalancerArn": "arn:aws:elasticloadbalancing:ap-northeast-2:xxxxx:loadbalancer/app/umemoto-ALB/xxxxx",
            "Port": 80,
            "Protocol": "HTTP",
            "DefaultActions": [
                {
                    "Type": "forward",
                    "TargetGroupArn": "arn:aws:elasticloadbalancing:ap-northeast-2:xxxxx:targetgroup/umemoto-TGN/xxxxx",
                    "ForwardConfig": {
                        "TargetGroups": [
                            {
                                "TargetGroupArn": "arn:aws:elasticloadbalancing:ap-northeast-2:xxxxx:targetgroup/umemoto-TGN/xxxxx",
                                "Weight": 1
                            }
                        ],
                        "TargetGroupStickinessConfig": {
                            "Enabled": false
                        }
                    }
                }
            ]
        }
    ]
}
これでリスナーの設定ができました。
ALBの設定はひとまずこれで完了です。(後にHTTPSの設定もします)
5.検証
これからALBの検証を行っていきます。
5-1.疎通確認
PowershellのTest-NetConnectionコマンドを利用して今回作成したALBに対し通信確認を行います。
検証のため、ALBのDNS名を利用し以下のコマンドを使用します。
Test-NetConnection umemoto-ALB-154690738.ap-northeast-2.elb.amazonaws.com -port 80出力
ComputerName     : umemoto-ALB-154690738.ap-northeast-2.elb.amazonaws.com
RemoteAddress    : 15.165.22.190
RemotePort       : 80
InterfaceAlias   : Wi-Fi
SourceAddress    : 192.168.1.11
TcpTestSucceeded : True
以上の出力からALBに対しHTTPで接続できることを確認できました。
5-2.フェイルオーバー検証
現在ALBを利用して二台のEC2インスタンスを負荷分散しながら運用していますが、ここで片方のEC2インスタンスを停止させてもWordpressを正常に動作させ続けられるかの検証を行います。
作成時同様EC2インスタンスの操作はCLIで行います。
※こちらの検証はACM構築後に行っています。
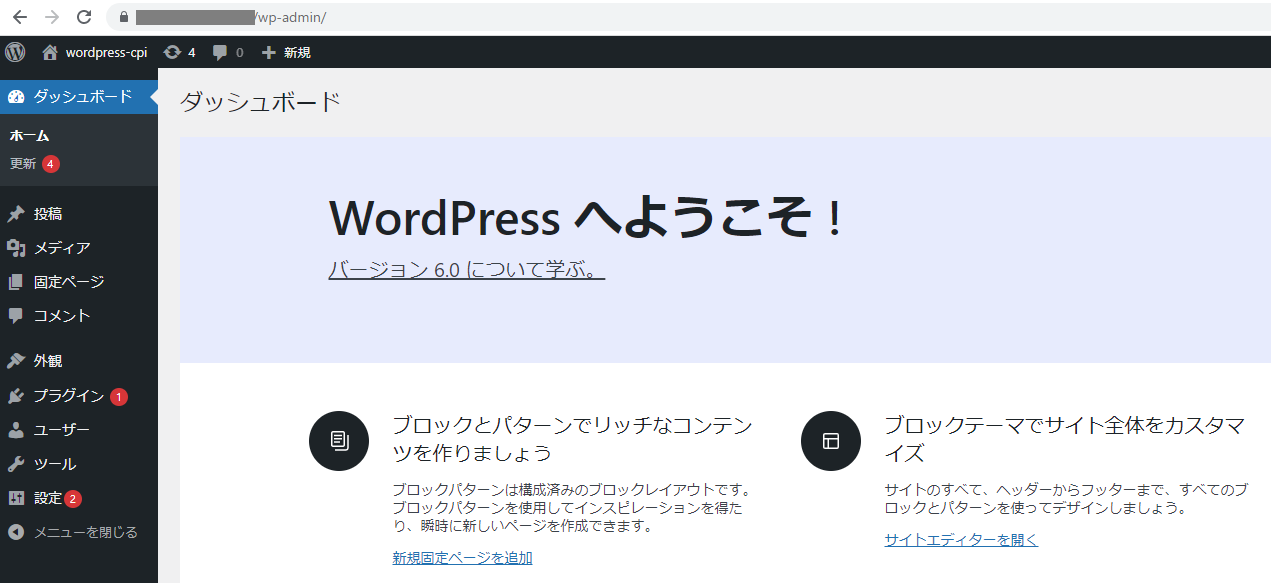
①まずWordpressのダッシュボードに移動しページを表示しておきます。
②片方のEC2インスタンスを停止するため以下のコマンドを使用します。
aws ec2 stop-instances --instance-ids [instance_id]出力
{
    "StoppingInstances": [
        {
            "CurrentState": {
                "Code": 64,
                "Name": "stopping"
            },
            "InstanceId": "i-xxxxx",
            "PreviousState": {
                "Code": 16,
                "Name": "running"
            }
        }
    ]
}
③停止できたか、以下のコマンドを使用して確認します。
aws ec2 describe-instances --instance-ids i-xxxxx --query "Reservations[].Instances[].State[].{InstanceStatus:Name}"出力
[
    {
        "InstanceStatus": "stopped"
    }
]
停止を確認できました。
④最後にダッシュボードのページを再表示してもエラーにならないか確認します。「F5キー」でリロードします。
再度問題なく表示することができました。
これで検証を終わります。
6.感想
特に問題なくALBの作成を行うことができました。
次回はRoute53の設定を行っていきます。
7.参照
AWS CLI Command Reference – elbv2
https://docs.aws.amazon.com/cli/latest/reference/elbv2/